Lookout Mountain AEROTOW
Learn how to fly at America’s #1 USHPA CERTIFIED Free Flight Resort
Our AEROTOW STUDY GUIDE
To be used with “Towing Aloft” and “Hang Gliding for Beginner Pilots”
WHAT IS AEROTOW?
Aerotowing is a method of launching where the glider is towed aloft by an ultralight aircraft. Gliders can be equipped with an extended keel and wheel or be supported by a cart that will roll behind the tug plane until lift off.
WHY LEARN TO TOW?
By earning your AT (aerotow) sign off, you will dramatically increase your skill level as a pilot and your air time.
On tow you really have to pay attention and do some “on the ball” flying on the way up.
The sled runs are a lot longer and you can be towed directly to the lift at times.
You can fly when the wind is blowing the wrong direction on the mountain.
You can fly repeatedly without having to break down and set up again.
EQUIPMENT
To fly solo you will need to own and maintain a primary and secondary release, two piece bridle, a full-face helmet, parachute, safety glasses and have a hook knife attached to your harness.
THE TOW POINT
The tow point is on the keel where the bridle hooks into the primary release. It must be set and test flown by a qualified pilot or instructor. This is to insure that the tow point has been correctly set. You may want to mark the tow point on the keel with some kind of permanent mark so that you can check to make sure that it hasn’t moved over time.
Bar pressure in aerotowing refers to how much you need to pull in to stay in the correct position behind the tug. If your glider has a lot of bar pressure on tow, the tow point may be set too far back. This causes the glider to tow at a higher angle of attack than is necessary.
The tow point being set too far forward is a larger concern which we try to avoid as it will set the angle of attack too low. Don’t hesitate to have an instructor test fly your glider and reset the tow point if it feels wrong.
PRIMARY RELEASE
The primary release attaches to the glider’s keel by connecting a mini carabiner directly to your predetermined tow point. To pre flight the primary release you need to check several things before each flight. If you have purchased a barrel release from us, it comes with an owner’s guide. Pgs. 292-294 Towing Aloft
SECONDARY RELEASE
The secondary is a barrel and hook release that attaches to the harness shoulder loop and one end of the bridle in case the primary release fails. Test it before you fly every time. Check the hook to make sure there aren’t any burs that could catch on the bridle or wear it down.
BRIDLE
The bridle is two pieces of spectra line connecting your harness to the release. This is what the tow line hooks onto. You will have a short and long part. Check the entire length for fraying and make sure the stitching on the ends is secure. Pg.288 Towing Aloft
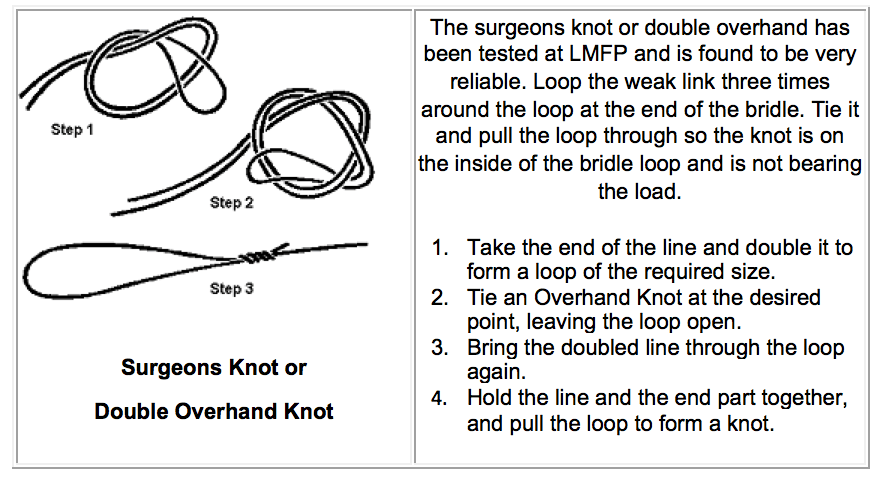
WEAK LINK
Check your weak link every time before you fly. The weak link is used to protect the equipment by breaking at 80 to 100 percent of the combined weight of the pilot and glider. We have two rolls of weak link in the tow trailer. Pick the weak link line appropriate for you. One roll is for pilots 200 pounds and over. The other is for pilots less than 200 pounds. Replace your weak link every ten flights or earlier. If you are having problems with the weak link breaking there are some things you can check. Look for sharp edges on your primary release and go over your launching and flying technique: Pg. 319 Towing Aloft, Grapevine Knot pg. 366 Towing Aloft. Have a staff member check your knot the first time and every time afterwards that you have any doubt if it is tied and looped correctly.
HOOK KNIFE
The hook knife is used to cut your bridle in case you can’t release for any reason. Do not use it for any other purpose. Oil the blade to keep it from rusting, and, if it does rust, put a new blade in it. There is a set of spare blades in the handle. If you ever need to use it, you will want it to be sharp. Make sure it is tied to your harness so you don’t drop it!
PARACHUTE
Keep a record of the maintenance on your parachute. They need to be repacked every six months. If you leave your harness out in the sun or in the heat of a car trunk, the rubber bands will become brittle and can melt. Preflight your parachute every time before you fly. Check the pins, hook and loop, and bridle to make sure they are secure. If you bought your parachute new, it may have an owner’s manual with it.
SAFETY GLASSES
Ideally everyone around the towing operation should be wearing some kind of eye protection. Even sunglasses are better than nothing. Tow lines break, weak links break, bugs fly up from the grass, many things can happen and it’s really hard to fly, if you can’t see!
FULL FACE HELMET
Do you like to walk around like a movie star with your helmet crooked and unclipped? Check your chin strap as part of your hang check and save that face. If you have a visor, it’s a good idea to check the bolts periodically.
HARNESS
You will start out using a knee hanger type harness. The first time, we will help you get into it and check the lines. As part of your training, you will need to familiarize yourself with how to wear it, how the rigging is set up and how to check the knots. If something doesn’t look right to you, bring it to the attention of a staff member. When you get your own harness, you will be responsible for the maintenance. If you need help adjusting the rigging ask an instructor or qualified staff member to help you.

DOLLY CARTS
Dolly carts are owned and maintained by the Flight School. The dolly is detachable take off gear. That’s it. It is used so a pilot doesn’t need to foot launch the aero tow. No running necessary.
Before you think about using a cart for take off, treat it like part of your aircraft and do a thorough preflight. If you do happen to find something amiss, turn the cart upside down and notify a staff member so it won’t be used by anyone else until it’s fixed.
Check the A.O.A. (angle of attack). If you stand back from the glider and compare the glider profile to the ground, the angle should be 15-25 degrees depending on the type of glider. If you are unsure, ASK! We have a gage to measure the angle. Also, check that your glider will come free from the cart without snagging, especially check the keel area. Some carts may be adjusted to your glider, some may not. If you are unable to adjust the cart to be properly set up for your glider, use another cart. Pgs. 76-79, 302-303 Towing Aloft
Every cart should have some way to keep you attached to it until the glider is ready for lift off. Usually this consists of a rope or length of hose for the pilot to hang on to just below the base tube. The rope should be adjusted to fit taut in your fingers when you hold it.
Hold yourself in the position you are hanging in and DO NOT allow the force of the rope to pull you forward in the control frame!! High-speed tow whacks are very serious.
THE FIN
Our solo aero tow gliders are equipped with a fin for yaw stability. When you fly your glider for the first few times from the cart, we highly recommend that you use a fin. Keep using it until you don’t have any oscillation issues. Some gliders are more stable than others. There are fins available in the LZ and at the pro shop. You may want to purchase one to use on a permanent basis for aero tow. Our repair shop can install the fittings for you.
A SIDE NOTE ON PREFLIGHTING YOUR EQUIPMENT
After you’ve preflighted your glider and declared it airworthy, you need to do the same with the rest of your equipment. Be super careful with any rental equipment, there’s no telling what someone else may have done to it. We suggest you purchase your own equipment as soon as possible, but rental or personal, preflight your equipment as well as your glider. Make double sure your parachute pins are in place.
-1920w")
SOLO AEROTOW PILOTS MUST ACCOMPLISH THE FOLLOWING TASKS BEFORE MOVING INTO THE LAUNCH LINE:
When tying your glider on to the tow cart for field transportation, only attach rope from hang loop to tow cart. This will help insure that you are not attached to the cart unless you want to be.
Position the glider perpendicular to the runway until you are ready to fly.
Preflight glider, harness, primary release, secondary release, bridle and any other equipment you are going to fly with.
Do a release test — primary and secondary. Note: You do not need to be on a launch cart to perform this check.
Check your weak link. Is it properly tied and in good condition?
Weather conditions: Are they appropriate for your rating/experience level?
Pilot condition: Are you alert, not fatigued or dehydrated?
Place your glider on a launch cart, hookup your bridles, primary and secondary releases. Our towlines are equipped with carabineers for fast turnaround.
Ensure your glider is not attached to the cart and that nothing will catch or hang on the cart.
Do a hang check. Pull forward to check clearance over base tube.
Is your bridle routed properly?
Have your tow ticket in your hand or easily available when you move into launch position.
When you are ready to fly, move into the launch lane or into line if there are pilots ahead of you. Pilots who get to the launch position not ready to go will be asked to give way so as not to hold up pilots who are ready. (Do not be this pilot!!)
When a ground crew person is not available, please present your tow ticket to the tug pilot. If available, have another pilot help you hook up to the rope and spot for traffic.
Did you log your flight??!
When you and the tow pilot are the only individuals present, you must check for traffic as you hook up the rope. Make sure that you have already performed a proper preflight and hook in check.
After landing, if you want another tow, please clear the runway and walk back to the takeoff point. Use the buddy system to help retrieve each other. Please remain clear of the runway.

THE TAKE OFF
Congratulations! You are ready to fly. You’ve got your fingers in the loop for the release. There is just enough slack so you don’t release on a bump. You’re cleared for takeoff. The plane starts to accelerate. You’re rolling down the runway – the wrong way!
The dolly starts to roll at an odd angle. What do you do? Don’t panic, it’s not that big of a deal. Relax, and give the cart a nice stiff jerk back to where it should be (not weight shift). Don’t over do it though, you need to fly the glider above all. Never try to steer the cart with weight shift. It won’t work and it will almost guarantee that you will leave the cart in a turn. Weight shift is for steering the glider. If you feel a wing lift while on the dolly, fix it, before letting go. Any time you don’t like how things are going – release!
So how do you know when the glider is ready to fly? The control bar will be getting light on the blocks and you will start to feel the weight of the cart. You don’t have to let go yet. You can wait until the wheels start to leave the ground if you want to. Sometimes the field is a little bumpy; you may be feeling the control bar getting bumped around and mistake it for getting light. A smooth take off is the goal. Wings level with no popping up above air plane or whacking off the cart.
Pgs. 306-309 Towing Aloft
Every flight may have different levels of climb. The conditions in the field will dictate a lot of what happens on takeoff and how fast the plane will be coming out of the field. You may gently fly off the dolly or you may pop up. Be prepared for either. If you pop off the cart, try to dampen the climb by pulling in quickly but be prepared to let the control bar back out to climb. Many mountain pilots that are new to aero towing have a tendency to pull in and not let it back out. They are thinking pull in for safety. You have to climb with the tow plane as it climbs. Let it.
Position the glider about ten feet above the ground and wait for the tug to leave the ground. It will happen fast, so if you are a little high, just stay where you are so that you are not descending while the plane is going up. Take note that your movements while towing will be faster and smaller than you are accustomed to making while boating around at normal speeds. You will be flying at approximately 35 miles per hour and your glider will be more responsive than when it flies at 20 miles per hour. React rapidly but not too largely.
When the tug breaks ground you will probably climb quickly – maintain position about 10 feet above the tug’s tail. Hold a position of ten to 15 feet above the tug plane for the first 500 feet of altitude. When you want the nose to climb, ease the bar out before you get low and it should climb automatically. There will be times when you have to physically push out on the bar. Never do this below 500 feet. Being a little above the plane is okay, being low is no good. Once you reach 500 feet of altitude, you may adjust to the exact level position behind the plane. We call this the sweet spot.
Anytime you are uncomfortable and still near the ground just after launch, pull in for airspeed, release, and land straight ahead. The landing approach you will need to perform will depend on your altitude and position in the field.

PILOT UNDER TOW
Read chapter nine in Towing Aloft.
The most important thing that you need to think about while you are behind the airplane is:
What will you do if you are released or need to release?
Have a plan at every moment. The very first thing you will do any time you release is pull in for airspeed, release and land in the predetermined spot consistent with your ongoing plan. Remember, lockouts are always preventable, just release.
POSITION
If the glider starts yawing – ignore it – only weight shift if the glider wing drops. It’s all about keeping your wings level. When you are out of position, you can catch turbulence from prop wash or wing tip vortices. Look for the reference points to determine your proper position behind the tug – mirror above wing strut, wheels on horizon (tough in the mountains). Look at the angle of the tow rope and see if it is level across to the plane. Learn the sight picture with your instructor.
Your instructor will explore with you the outside edges of the cone of safety. Think diamond – go to the top of the usable vertical position then out to the edge and then down to the top of the prop wash and then out to the other outside edge. Develop a mental image of this cone of safety.
Pgs. 323-327 Towing Aloft
Don’t give up your energy and maintain speed. It is possible to stall behind the airplane. If the angle of attack is too high, the wing will stall. The glider will tolerate this as long as the rope is attached and the glider is being dragged through the air. If the rope breaks or the pilot releases you, you will lose a lot of altitude trying to recover. Avoid putting yourself in this position.
Accelerated Stalls: Pgs 318-321 Towing Aloft
Pgs 129-130 Hang Gliding for Beginner Pilots
TURNS
It helps to keep your eyes on the upward (outside) wing of the plane during a turn. Remember the basic rule: You will fly where you are looking. Aim the nose plate one foot from the wing tip. The glider will track cleanly without much input if you have turned correctly. When you get too far to the inside, you will get too slow and your glider will start to lose altitude while the tug plane keeps climbing. You will feel no bar pressure. When you get too far to the outside, your glider will whip around quickly gaining altitude and climbing too high on the tug plane. There will be more bar pressure.
Pgs. 327-332 Towing Aloft
On tow, one situation we want to avoid is a lockout. A lockout is an accelerating turn away from the tug. When you are entering a lockout, your option is to release. There is no point trying to hold on and save it. That would be dangerous. Generally, when your bridle is getting close to touching your nose wire, you are close to lockout: release. When you are low enough to feel prop wash, you are close to lockout: release.
Pgs. 333-334 Towing Aloft

LEARN THE HAND SIGNALS
Communication is the key. Be alert, when the Tug Pilot is waving you off with a rapid arm motion, it is a sure sign that you had better release immediately or you are going to get the rope!!!
Pgs. 281-283 Towing Aloft
PLANNED RELEASE
Once you’re at altitude, the tug pilot will signal you to release. For many reasons it is very important to release whenever the pilot gives you the release signal. The first thing to do is pull in on the control frame to lower your nose, then, release from tow. Remember, when attached, you are being pulled in a stalled attitude. You need to pull in to get flying again. After pulling in and releasing, make a gentle right turn as the tug plane will turn left. Get your bearings straight and fly in the direction you wish, keeping in mind wind direction and LZ direction. Roll up your bridle and tuck it into your harness so you don’t trip on it in the field. Enjoy your flight!
Pgs. 334-336 Towing Aloft
EMERGENCY RELEASE
Be prepared to be released at any time! The rope can break as can your weak link. The tow plane could be having issues. As you are towing out of the field, look and plan where you will land. If the need arises, release, pull in, and wait until the tow plane’s intentions become apparent and then execute your ongoing landing plan. If the tow plane is on fire, leaking fluids or the aileron is falling off; the tow pilot may not know the issue. Release immediately, you will be given another tow. Land and report the problem to the tow pilot.
Emergency Procedures: Pgs. 337-340 Towing Aloft
You are the only one that can take responsibility for your flight. Aviation is about risk management. To be a good pilot you need to fly within your skill level. This means leaving yourself room for unexpected circumstances.
The order of your options when the primary release fails is:
1. Secondary release
2. Cut the tow bridle with your hook knife
3. Let the tug pilot release you
4. Fly 90 degrees to the tow plane and see if your week link breaks
In a lockout, the force on your primary release is greatly increased. There is a chance it will not open. The weak link is designed to break before this point. If it hasn’t, you have a matter of seconds to react. Do not hesitate to pull your secondary release. If for some reason you can not get to your secondary, cut loose. Trying to break the weak link on purpose may fail putting yourself and the tug plane in a more hazardous situation than just cutting the rope. In any form of aviation, occasionally the unexpected happens. Pilots who want to have a long, safe flying career realize this fact and try to plan for it.
Let’s examine some common unexpected events that could happen while aero towing.
The weak link on the plane may break.
The tow pilot waved for you to release and you didn’t, then he gave you the rope. This should never happen.
You were in or near a lockout and the tow pilot released you, again, this should never happen.
Problems with the tow plane. Perhaps the engine quit on takeoff, maybe water, oil, or fuel could leak in flight. Do you see smoke?
Let’s say you’re having trouble controlling the glider or you can’t maintain position behind tug – your glider wants to keep climbing or sinking.
The parachute is used for emergencies. They are hardly ever needed; however, we use them and require them for aero towing at Lookout Mountain Flight Park. If you ever encounter a structural problem bad enough to throw the parachute, always know to release from the tow plane before you deploy the chute. Always make sure that the parachute pins and hook and loop holding the chute in your harness are checked. The potential of accidentally deploying a parachute is real. Any parachute deployed at a low level is a very dangerous situation.
Parachute Deployment: Pgs. 242-244 Hang Gliding for Beginner Pilots
In any of these events the solution is the same: release immediately.
Pull in.
Know in advance where you will land and do it.
In an effort to prepare you for the unexpected, we incorporate oscillation training and simulated weak link breaks in your aerotow training.
Remember, you could inadvertently release at any time, so while on tow you should have a flexible contingency plan that adapts to your position in the air as you are climbing. The bottom line is you can always release.
THE TOW ROPE
The rope is roughly 250 feet long. Do not drag it through the trees. This could be a very bad situation that you must avoid at all costs. Dragging the rope and catching it on a tree will pull you straight down to the ground. If you get the rope don’t worry about coiling it when you are low; instead just drop the rope over a safe spot (not on people, the tug plane other gliders, etc.). At higher altitudes it is near impossible to judge where the rope would fall. Coil or wad it up and drop it when you can safely. Keep in mind that the primary release may not work as there is little to no tension on the rope. You may need to use the secondary release with one hand while pulling the bridle tight with the other hand. Remember the order of release: primary, secondary, hook knife.

Your first solo flight should be approached with the confidence. If you have any doubts, no harm can be done by taking another tandem with the specific situation in mind that you need work on. Please do not hesitate to ask the staff any questions you might have or to seek assistance with problems or questions. Our goal is to make your flying experience at Lookout Mountain Hang Gliding fun and hassle-free. Your help in keeping things running smoothly is greatly appreciated.
COMMON MISTAKES
Popping up off the cart and rising too quickly. Remember to skim the ground at ten to 15 feet until the tug starts to fly.
Getting low on the climb out. The climb out of the field may be steeper than you are anticipating. Pay attention.
Over-controlling, over-correcting. Make small, immediate corrections. Don’t wait and have to make a big fix, especially in pitch.
SOLO AEROTOW OPERATIONS
We always do our best to get everyone in the air as quickly as possible. Be patient and bear with us. We have limited staff. Thank you for your understanding. In order to ensure an enjoyable experience for all pilots, the following procedures are in effect for the aerotowing operation:
Vehicle parking is not allowed at the tow pavilions or on the roads. Please park your vehicle at the south parking area, north parking area, clubhouse, your campsite or your cabin. Drop off and pickup of gliders and equipment is okay, but please stay on the roads and do not drive onto the field.
Please remove your glider from the launch cart if you are not ready to fly. A tie down cable has been installed for your use. Please do not leave your glider unattended and unsecured. A wind gust or dust devil may damage your glider if it is not securely fastened to the planet.
Pilots that are not ready to fly are asked to keep their gliders facing perpendicular to the runway to avoid confusion with the tug pilots. When you are ready for take off, move your glider to the flight line and face it down the runway.
Avoid standing in the flight path when the tow aircraft are landing; they are pulling 250 feet of towline with a metal connector on the end of it. The wind may whip the line around and injure you or cause damage to your equipment if you are in the way. Please be alert to ongoing operations! It gets quite congested at times.
Children and animals must be supervised to ensure they do not wander into dangerous areas or put glider and Tug pilots at risk.
Use the Buddy System: If you see someone who needs a retrieval or help with something, hookup the tow rope or other assistance; give them a hand. You will need help when it’s your turn to fly!
ALL SOLO AEROTOW PILOTS MUST POSSESS APPROPRIATE RATINGS, ENDORSEMENTS AND A CURRENT FLIGHT PASS