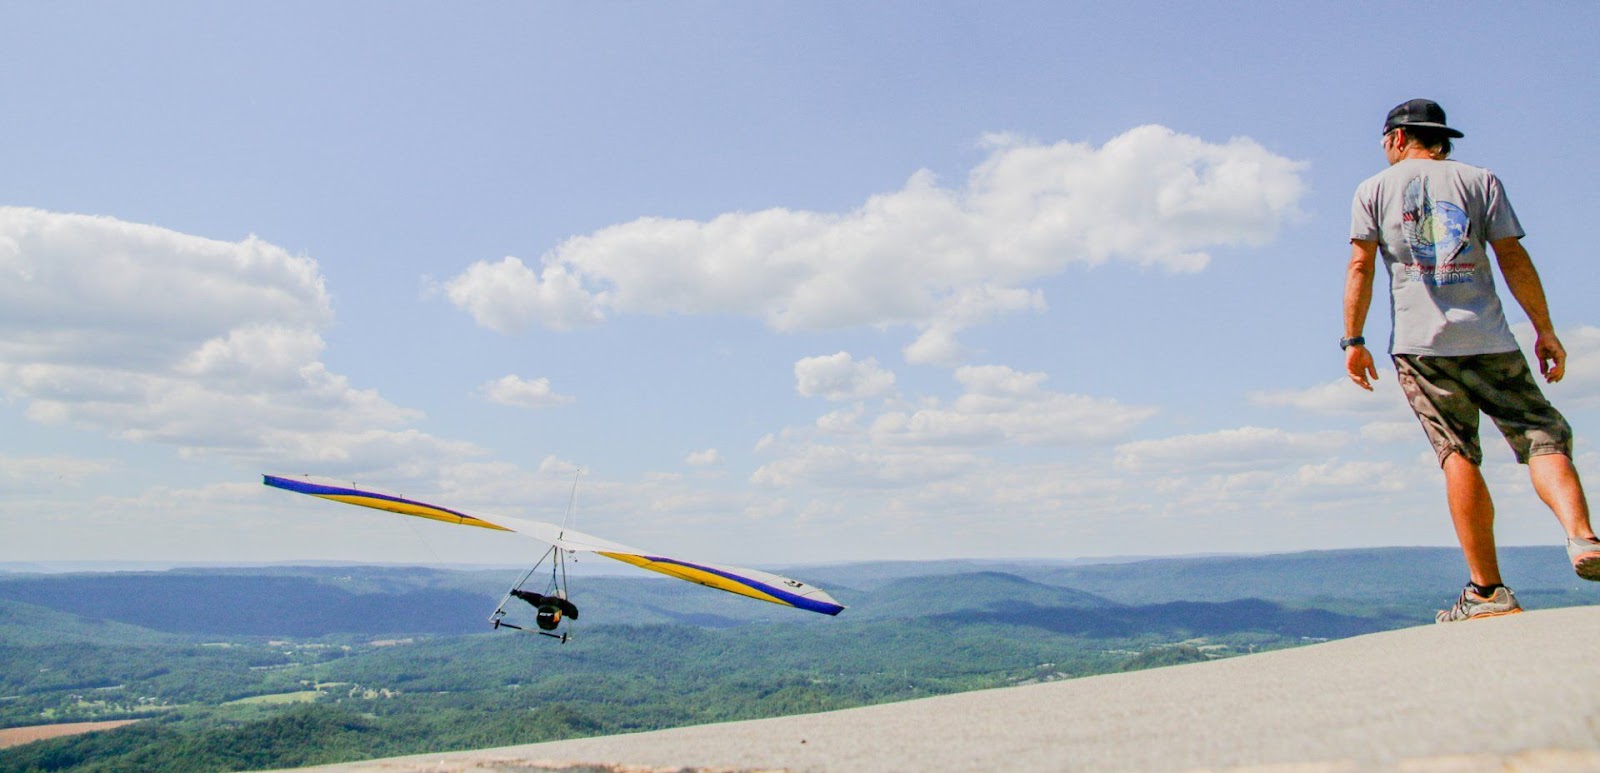
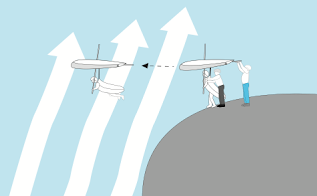
Assisted Windy Cliff Launch
Learn how to fly at America’s #1 USHPA CERTIFIED Free Flight Resort
Assisted Windy Cliff Launch (AWCL)

1) How do we go about this?
2) What is a confident and aggressive launch?
3) How do we define control?
4) Why are cliff launches special?
5) Your responsibilities as pilot in command
6) Pre-launch
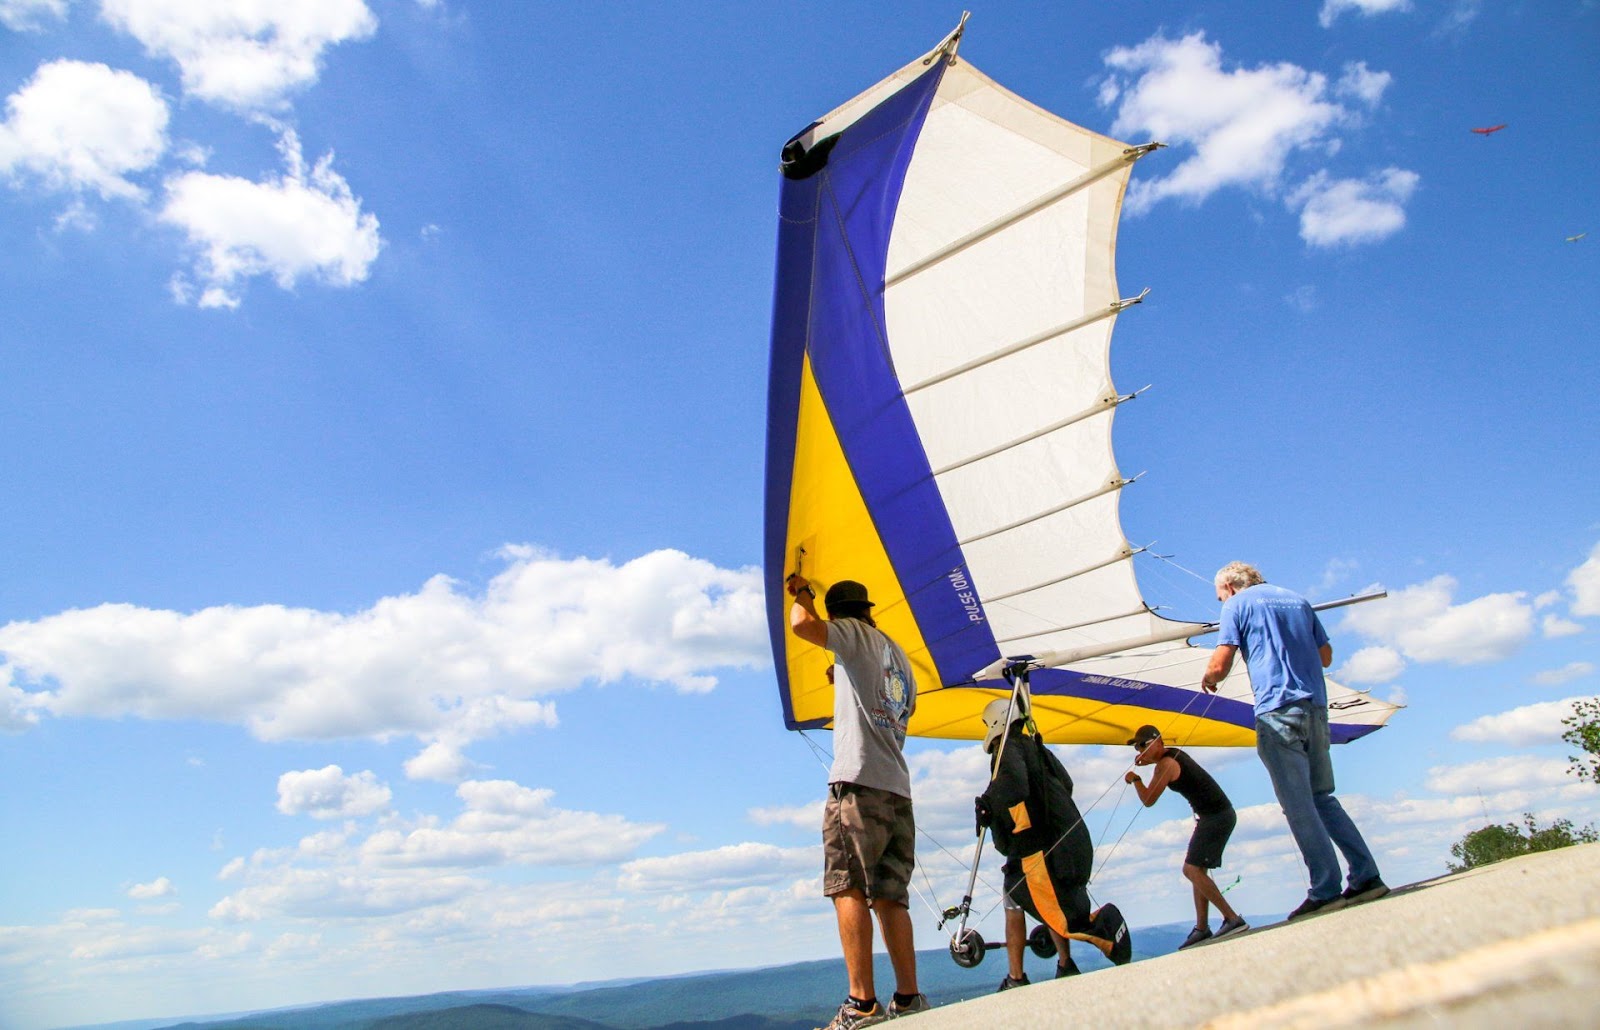
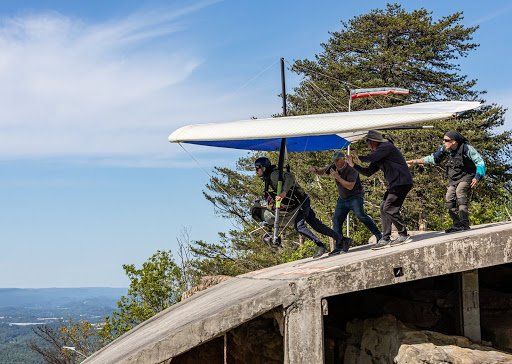
7) The responsibilities of a wirecrew
8) Common wirecrew complications
9) How to pick a wirecrew
10) Release signals

To get your USHPA Assisted Windy Cliff or Ramp Launch (AWCL) signoff requires “the demonstration of your ability to launch with a wirecrew in windy conditions from a precipitous cliff or ramp with strong lift at takeoff. In doing this you must show proper use of release signals and a confident, aggressive launch.”
Now before we get into the particulars of how to go about launching in windy conditions, we would like to make a precautionary note; your AWCL is a H3 signoff, so while you may be able to work at these skills under the supervision of an instructor before making your 90 flights and 10 hours, please do not get ahead of yourself and think that just because you’ve done it once or twice with an instructor by your side, that you are ready to launch every time it is ridge soarable.
It is vital to keep in mind that the most dangerous time to ridge soar is in marginal conditions (8-12 mph) AND that while it is easier to get up in stronger conditions (15+ mph), you then need to land! Riding out gusty rodeo air can be wildly thrilling, and also flat-out terrifying, but hanging on for that ride might still be a safer alternative than attempting to land in a shredded field of rotor.
Remember, if you launch in windy conditions, you either have to ride it out until the field is in shadow and the wind abates, or land in windy, thermally and potentially rotor-filled conditions. Don’t step off unless you are ready and able to get back down!
Over the course of this tutorial we will go over the definitions of a confident and aggressive launch and the characteristics that make a cliff launch unique from a flat slope. In order to gain as much control as possible in a windy cliff launch setting, we will need assistance. We will therefore detail the proper positioning of our wirecrew, the assistants we recruit to help manage our wing and achieve optimal control prior to launching in a windy cliff setting. We will also discuss our roles as pilots in command, how to accurately convey the type of release signals we would like to be used and how to navigate potential issues on launch.
1. HOW DO WE GO ABOUT THIS?
The first step in developing the skills necessary to launch from a cliff in windy conditions is reading training material like this generated by pros that really know the best practices. It is also a good idea to observe how experienced pilots launch in windy conditions and participate in wirecrews. Each launch site carries with it different environmental conditions that may require specific launch and wirecrew techniques, so always remember to ask the locals how and why they do what they do. However, before you fly at any site, you should also observe in person and see for yourself how pilots are actually launching and assess how that compares with what you have been told and what you are hearing.
It is important to understand that different pilots will have different expectations of how to manage a wirecrew, often called “wing spotters” in lighter conditions. On launch you may have multiple pilots who learned in different places, from different people and at different times with different equipment. There is no single standardized approach on how to manage a pilot’s wires.
What we present here has been tailored to Lookout Mountain’s cliff launch site. These best practices were first developed on our original concrete ramp built in 1976 and then adapted to our 2006-modified radial ramp. Lookout Mountain is one of the most popular places to fly; over the years our two ramp designs have been the start for thousands of spectacular flights. The information presented here is based on years of experience by our expert instructors and are, we believe, the best launch techniques that can be used to minimize the risks associated with windy cliff launches in a variety of situations.
2. WHAT IS A CONFIDENT AND AGGRESSIVE LAUNCH?

Regardless of site characteristics, every good launch requires the same core components:
1) Maintaining the proper angle of attack of your wing, AKA nose angle, in relation to the oncoming airflow; 10-15 degrees above the air flow vector depending on your glider and the wind velocity.
Please note that in stronger winds it may be necessary, depending on launch site, to have a lesser- or lower-than-optimum angle of attack (AOA) in order to safely control your glider.
2) Maintaining a balanced and equally-loaded wing by commanding roll and yaw inputs.
3) Smoothly accelerating until the wing has enough airspeed to fly from launch with control.
4) Safely flying away from launch with enough airspeed to maintain control of the glider.
3. HOW DO WE DEFINE CONTROL?
Control is a complex concept. It is important to recognize that we are only able to exert 100% of our potential “total control” of a hang glider when our weight is fully supported by its hang straps. Until that point that our mass loses contact with the ground and our weight-shift inputs are being directed entirely through our hangstrap onto a fully-loaded wing, we do not have the ability to exert total control over our glider. Prior to becoming airborne, we can still have control of the glider, but it is not total; we will call this state “optimal control.”
Total Control = wing fully loaded with pilot disconnected from the ground
Optimal Control = wing fully loaded with pilot in contact with the ground
It is important to note that environmental variables may make it impossible for us to affect 100% of our control potential, either total or optimal; i.e. if you are flying in a stall or mush, you will not be able to utilize all of your potential total control.
Likewise, if you are trying to balance your wing in 15 mph winds with no assistance on launch, you will not be able to maximize your potential optimal control. As this tutorial is focused on launching, and not flying, we will keep our attention centered on attaining optimal control while on launch.
Optimal Control =
(Direct Control X Direct Awareness + Indirect Control X Indirect Awareness)
X
(Direct Control Inputs + Indirect Control Inputs)
“Optimal control” is made up of the “direct control” the pilot inputs individually into their glider and the “indirect control” added by the assistance of their wirecrew. Neither of these aspects can be recognized as part of the pilot’s optimal control if they are not aware of it, so we must add to the equation “direct awareness” and “indirect awareness.”
The pilot is made aware of their direct and indirect control by sensing their body and receiving vocal notifications from their wirecrew; respectively our internal and external forms of communication. If the pilot cannot feel how much input they are exerting on their glider, and the wirecrew is not telling them how much and what kind of effort they are applying in order to maintain its balance, then the pilot does not have optimal control.
Additionally, the pilot must be able to continually add “control inputs” – both directly and indirectly – as the conditions change. “Direct control inputs” are self-explanatory; the pilot exerts physical pressure on the glider in order to adjust its position. “Indirect control inputs” happen when the pilot tells the wirecrew how to manage their wing.
Communication is the most vital aspect throughout this process.
You cannot be aware without communication and without awareness you cannot have optimal control!
By yourself, as conditions strengthen, your ability to achieve optimal control of the angle of attack and roll and yaw orientations of your glider will become more and more difficult, and at a certain point – depending on the site and conditions you are flying in – it will actually become impossible without assistance. Your wirecrew is there to provide that indirect control assistance.
It is necessary for pilots to be aware that at certain sites where there is a steep mountain and/or cliff launch, they are not going to be able to be fully in control of their glider in windy conditions. Your wirecrew is there to make up for your lack of direct control and must clearly communicate how much input they are adding to the equation.
A wirecrew’s primary role is to help manage the balancing of your wings. Assisting in the management of your AOA is a secondary role. At a given site, many pilots – especially experienced pilots – may not need any help with their pitch control in the conditions they fly in, but they will almost always ask for wing spotters, even in light conditions. It is also fairly common that in lighter conditions experienced pilots may only want and need the help of one wing spotter on the up-wind wing in a cross-wind launch situation.
It is instructive to know that an experienced pilot using a wire crew in strong conditions can still feel that the glider is properly loaded. This is done by loading the glider with the pilot’s weight, approaching as-near-as-possible the loading when the pilot’s feet leave the ground. Until that point, however, we are still in the land of optimal control, and not total control. But, with enough wind, the glider will be “flying” while being held stationary by the pilot and their wirecrew. This causes our hangstrap to tighten and the glider to lift up off of our shoulders.
This is the preferred state to be in for optimal control in a windy cliff launch setting. The pilot physically senses their direct control on the glider. Their vocal interactions with the wirecrew and visual confirmation communicates their indirect control. When the glider becomes fully loaded, the pilot’s harness strap is tightened by the glider as it begins to lift the pilot’s weight. At this point the pilot is flying the glider on launch under optimal control conditions with the wirecrew holding the glider back from flying away until the pilot releases the wirecrew with their launch word – CLEAR!
In this situation, there is enough consistent wind to load the glider so that the pilot can somewhat control the roll and pitch of the glider through the control frame; hence optimal control and not total control. The pilot should be able to feel the moment that the glider is properly loaded and then says CLEAR and smoothly flies away. This is the ideal cliff launch scenario in stronger air. Getting the glider loaded properly requires good communication, patience and a practiced feel for when the glider is balanced.
As a new pilot, the amount of direct control you will be able to exert will be less than more experienced pilots. This is OK, it just means that it behooves you to have more experienced people on your wings helping you maximize your optimal control. A novice wirecrew launching a novice pilot is almost like the blind leading the blind, but – on the flip side – an experienced pilot should have no issues recruiting hang gliding-naive bystanders to help them in their wirecrew. This is because they know how to communicate the assistance they need in a clear and direct manner.
4. WHY ARE CLIFF LAUNCHES SPECIAL?
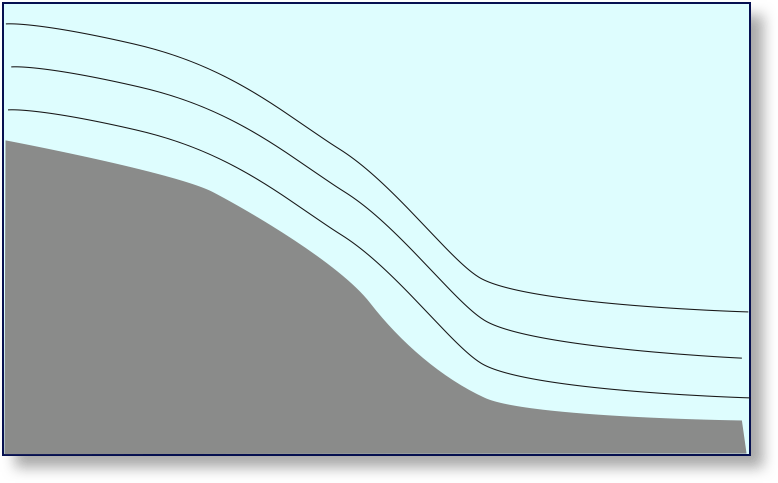
FLAT SLOPE LAUNCH

CLIFF LAUNCH
Flat slope launches, like our training hills, have fairly laminar air flow coming up their slopes. The wind where you start your launch is the same as the wind during your launch and it is the same at the end of the launch when you actually become airborne. In fact, on many flat slope launches, with the right amount of wind, you can be flying with minimal assistance and/or forward movement; just think of those moonwalk launches at the Point of the Mountain.

NO WIRE CREW 🙁
WITH WIRE CREW 🙂
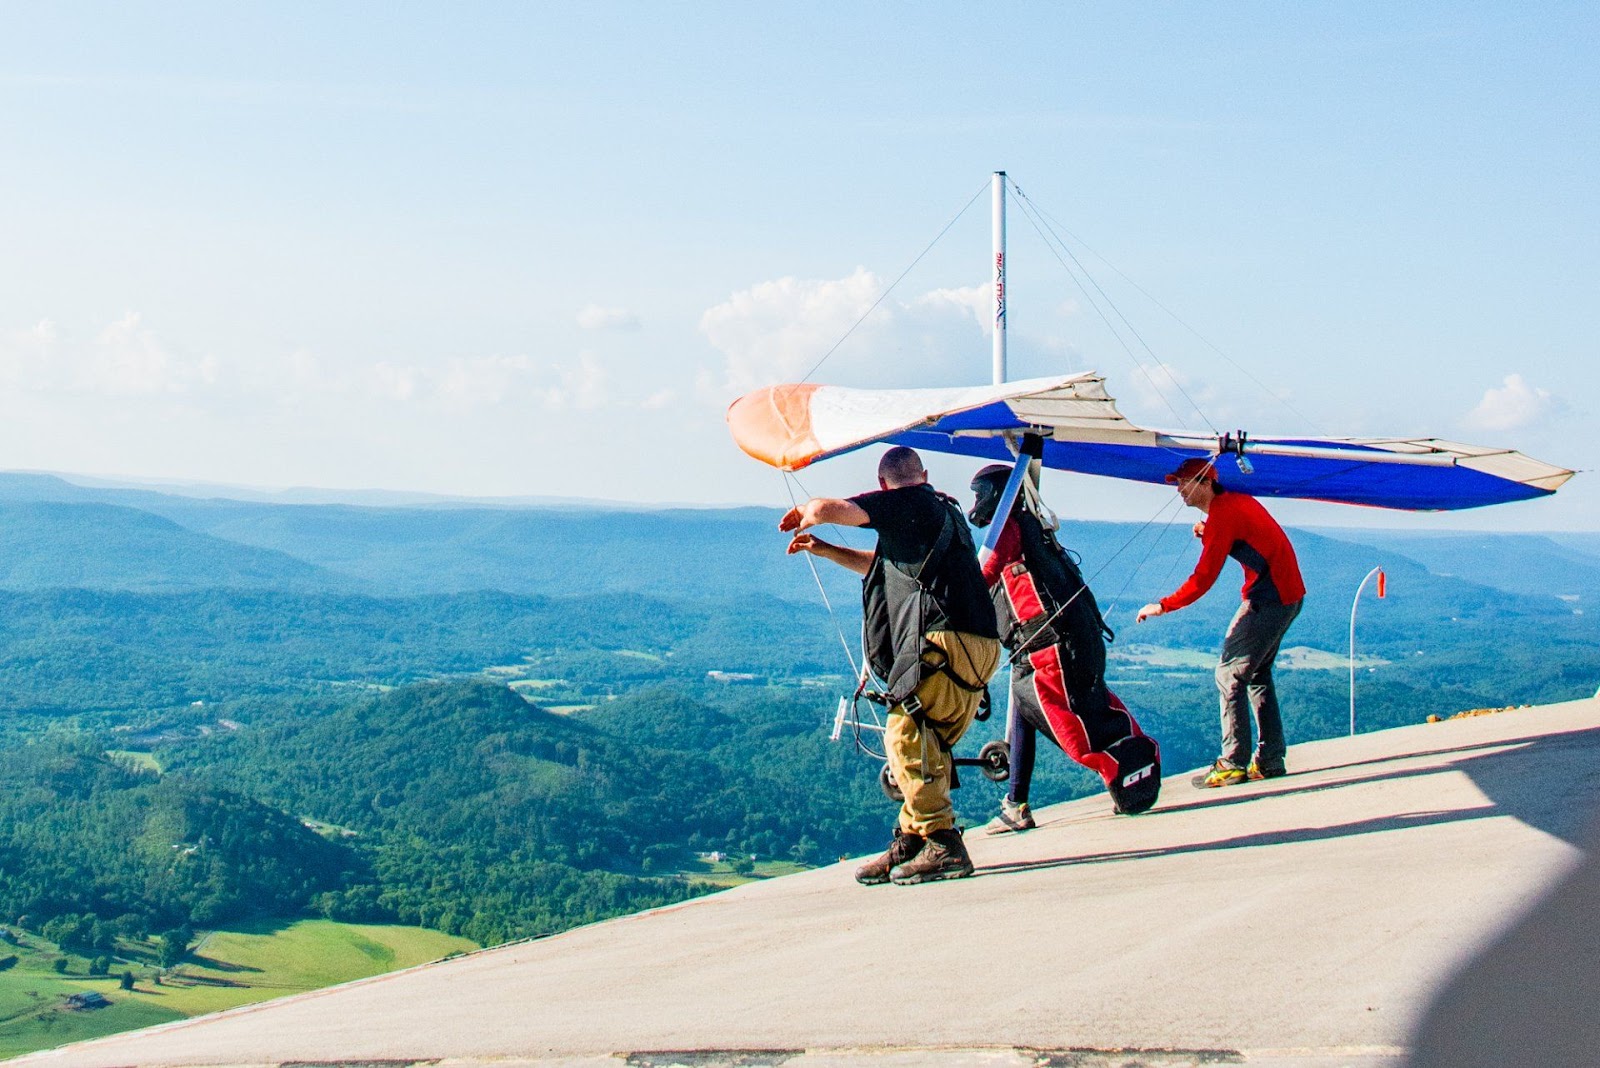
At a cliff launch, the air can be vectored almost straight up depending on the angle of the cliff face and the velocity of the wind. The wind is coming up from the ground rather than blowing at you from the horizon. In this scenario, it will be necessary for you to rely on your wirecrew to help stabilize your glider as you move closer to launch and into the rising airflow. Their job is to help you keep your nose low enough to match the upward rising airflow. It can be a pretty precarious situation as conditions strengthen, especially as you move inland from the smooth laminar airflow of coastal sites; add in gusty thermal conditions and the potential for crosswinds, and you can see why we used to have six-person wirecrews with everyone tied down for safety in old photos of the cliff launch on Lookout.

OLD LMFP CLIFF LAUNCH
Thankfully, we’ve got some bright bulbs in hang gliding and many popular cliff launch sites have built radial ramps like the one we have here at Lookout. The airfoil shape attempts to bring the benefits of a slope-style launch to the cliff.
LMFP RADIAL RAMP
Radial ramps like ours help establish more laminar airflow in a cliff launch setting, and in strong air can mitigate super strong lift transitions on launch, but the direction of the wind will still be quite vertical up the ramp. This means that on our mountain launch, you will need to set your AOA lower than you would at the training hills.
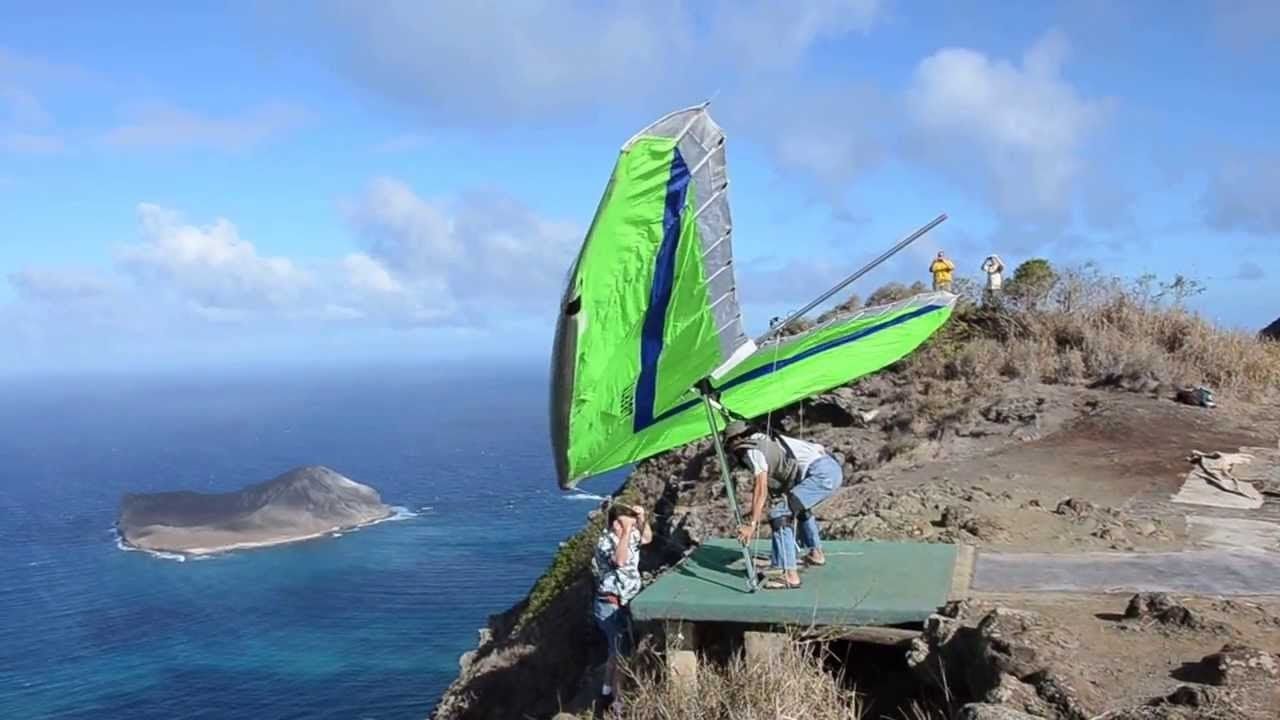
MAKAPUU, OAHU
At a sheer vertical cliff launch like that in Maui, you will have to have your nose pointed down considerably lower; at a 30 degree angle or steeper depending on the wind speed. The important consideration here is that it is the vector of the airflow and NOT the horizon that determines your wing’s correct angle of attack.
This is an important consideration in following Rule #2 of a safe and successful launch: Control the AOA (angle of attack / pitch / nose angle) of your glider! Failure to do so may cause you to lose control of your glider.
Popping your nose on launch can cause your glider to stall and then dive in an attempt to regain airspeed. It may subsequently climb quickly and potentially enter a turn. All of this can happen so rapidly that the pilot is often too surprised to be able to properly recover. This is one of the easiest ways to go hang out with the trees!
5. YOUR RESPONSIBILITIES AS PILOT IN COMMAND
What is Rule #1 you ask? Well that is that YOU, THE PILOT, ARE ALWAYS IN CONTROL! As stated previously, control is a complex concept, but regardless of whether or not you have the assistance of a wirecrew or not, you, and only you, are the pilot in command!
You are the only one to make the decision when and if you fly. Do not let other pilots or spectators rush or hassle you. Do not let peer pressure or bull-headedness make you fly in conditions you do not feel comfortable flying in. Do not let yourself think you can fly in conditions you know you are not ready for. At the end of the day, no matter who you have on your wire or who told you you could fly, it is you, the pilot, who is responsible for the results and quality of your launch and flight.
Remember; the first step toward having a good flight, is a good launch. If you feel any bubbles of disquiet telling you that maybe this isn’t a good idea; LISTEN TO THEM!
There is no shame in backing off of launch. There is no shame in waiting for calmer conditions. There is certainly no shame in packing it up and calling it a day. If you feel the conditions are blown out for your skill level and current mental/physical situation, sit and watch more experienced pilots fly, observe the weather evolve or go and ride your bike and hang out with friends.
The decision not to fly should be applauded because you are listening to yourself and the conditions; well done! There will always be more days to fly. DO NOT let the fact that other pilots are flying make you think that you can or should fly too!
If all systems are a go, the goals and best practices for a successful escape from gravity are maintaining your angle of attack and having a controlled and balanced wing prior to and throughout your launch. As a competent pilot, you should be able to maintain control of these factors at a launch like Lookout’s, by yourself, in light winds of 5 mph or less. In these conditions, it is more than acceptable for pilots to launch unassisted.
However, as wind velocities increase beyond 5 mph and the possibility of an increased gust factor compounds the situation, you will very likely want to have a wirecrew, or at least a wing spotter, by your side for assistance. Your glider’s wings have a lot of leverage; you are at the center of it. If one wing starts lifting and you can’t hold it down, and you don’t have a wing spotter or wire person by your side for just in case… at a minimum your glider is going to be damaged.
When conditions get to the point of being ridge soarable (10+ mph), you very likely may NEED assistance to maintain your proper nose angle and wing balance. Having wing spotters is a no-brainer in these conditions and they will help keep you from damaging your wing if you lose control of your glider, which is easy to do in even 10 mph of wind at Lookout! Anything above 15 mph and you will 100% need helping hands.
If you do not ask for assistance, and attempt to launch in 10+ mph of wind by yourself, you are very likely in for a painful and expensive experience. Not only that, but you will probably cause the launch to be closed for the duration of your rescue and cause a lot of folks to be inconvenienced by your poor technique and stubborn need to do it your way.
Attempting to launch without assistance and proper control is never a good thing. You are responsible for your actions, know what you are getting yourself into and learn how to manage the risk of launching in stronger conditions.
6. PRE-LAUNCH
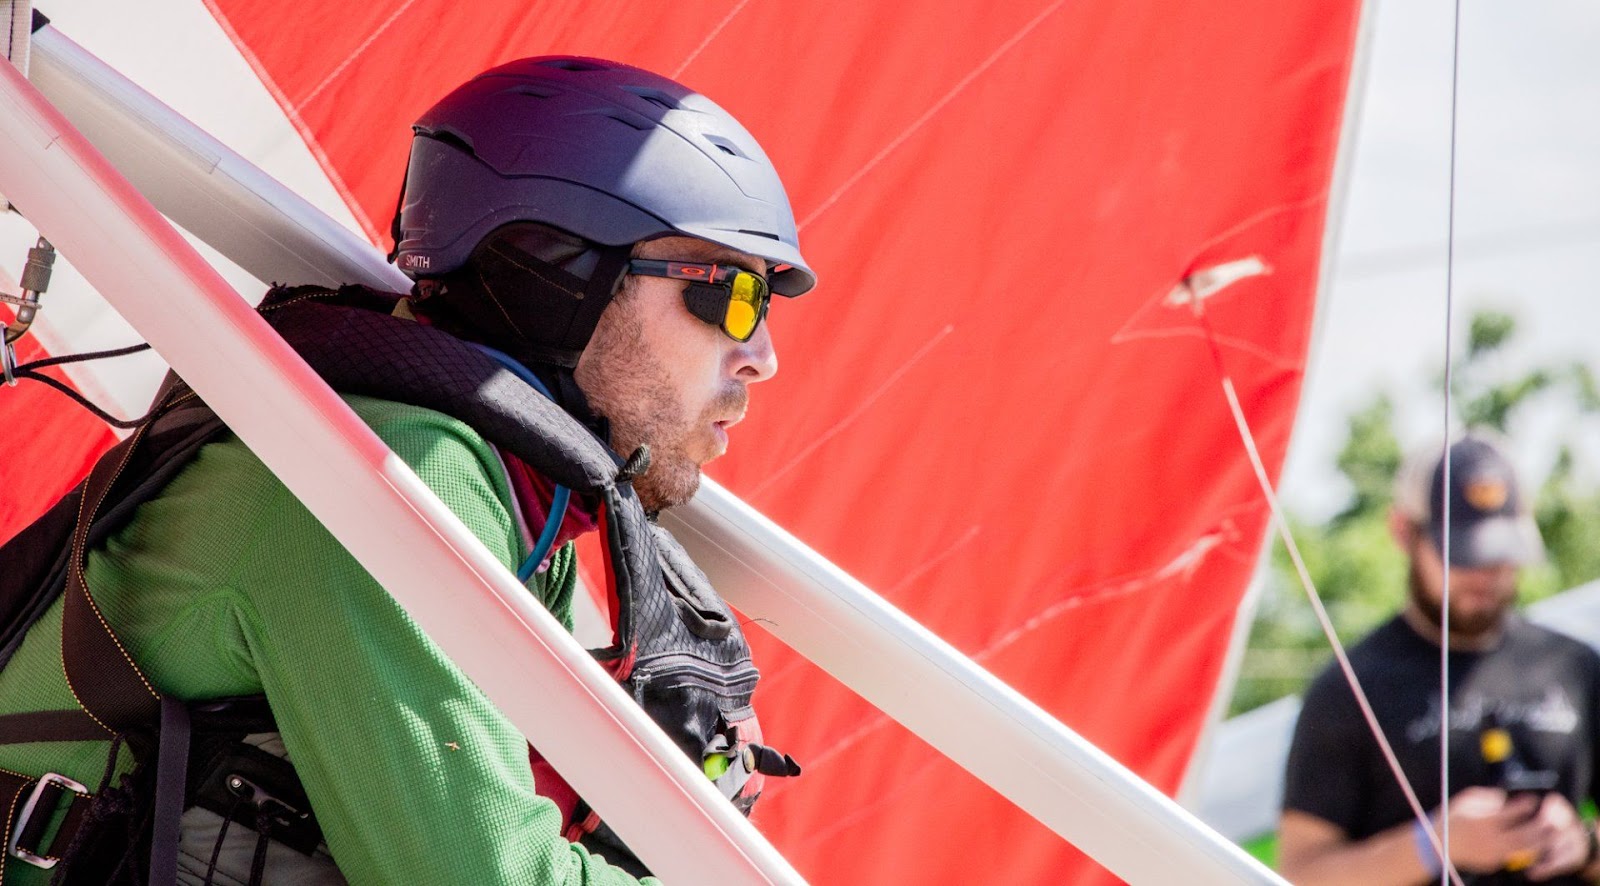
We all know this, but it is important to reiterate the need to thoroughly preflight yourself and your glider and perform a proper hang check every time before you get on launch.
As a wirecrew member, it is a good idea to give your pilot and their glider a quick onceover to make sure any potential problems like an unfastened batten, unmounted nose cone, unzipped undersurface, missing wingnut or safety pin don’t go unnoticed.
By the time a pilot comes up to the ramp, there should be nothing found out of position.
If something major is found to be wrong, we should ask the pilot to put their wing away and come back another day when their head is up for the task of flying a hang glider.
It can be difficult to get other pilots to help pay attention on your wire launch; do not expect them to catch an error that YOU missed! We need to be self-reliant as pilots; do not expect other pilots to be so generous as to give your glider a onceover. You might be kind enough to do this when YOU are a wirecrew, but do not expect it!
You know this, but never let someone else preflight your glider, you are the one depending on it to get you safely up in the sky and back down to earth!
Personal responsibility and self-reliance are integral parts of being a safe and successful pilot.
A proper hang check should be well ingrained in your mind from the training hills; but by the time you’re suiting up to fly in soarable conditions, you’ve likely added a few pieces of kit to your setup.
As always, your carabineer should be properly locked in both your primary and secondary hang straps. You should fully suspend yourself from the hang straps in order to ensure your lines are not tangled and that you have proper clearance over your base tube, typically one to three “fists.” Next, you will want to ensure your parachute pins are properly set up. While getting into your harness, you should have done the knee-push test to ensure your parachute pouch is thoroughly velcroed.
Now is also a good time to make sure that your vario is turned on and working and your airspeed indicator is properly orientated. If you have a heads up control for your harness or VG on your glider, make sure these are properly cleated and in your preferred settings. Finally, ensure your helmet is adequately tightened and secured and double check your carabineer and lines to make sure they are all locked and running clear. If all is good, stand up, take control of your glider and approach launch.
An important caveat here is that we find it is best to do your hang check right when you hookin to your glider, before approaching launch. Things on launch can get hectic; doing this crucial safety step before entering the fray is a wise step!
If you are a wirecrew member helping your friend do a hang check and they seem to have forgotten one of these steps, do not be afraid to suggest that they double check their parachute pins, hang loops or ASI positioning. In fact, if at any time while on launch, you see something questionable happening, do not be afraid to speak up!
No matter how experienced the pilot, we all make mistakes and neglect this or that in our enthusiasm to join the sky. This should be avoided at all costs, but nonetheless it happens to the best of us. Pointing out lapses in the aim of safety will never be frowned upon and will only garner you a big “THANK YOU!”
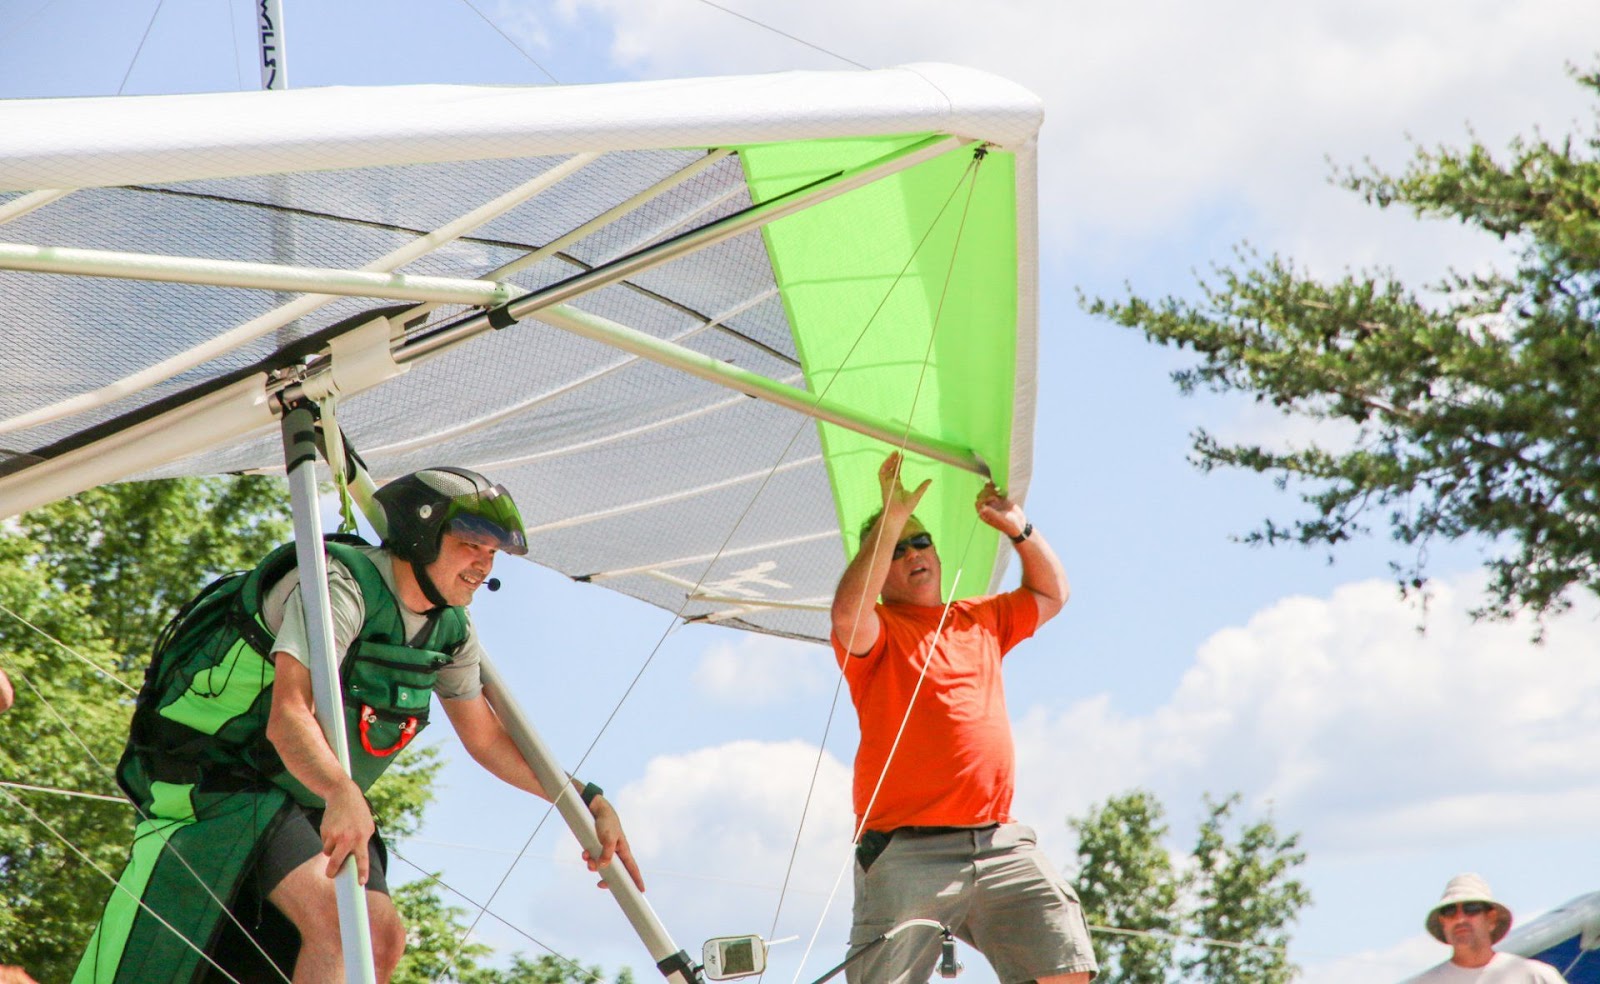
Alright, your glider is all setup and preflighted; you’ve done a proper hang check; gone pee; gulped down some water; had a snack; done a mental inventory of yourself and the conditions for the next few hours; donned your sunglasses and sunscreen and made sure you’re layered-up enough to venture out into the wild blue yonder. Now what? Now you must choose your wirecrew!
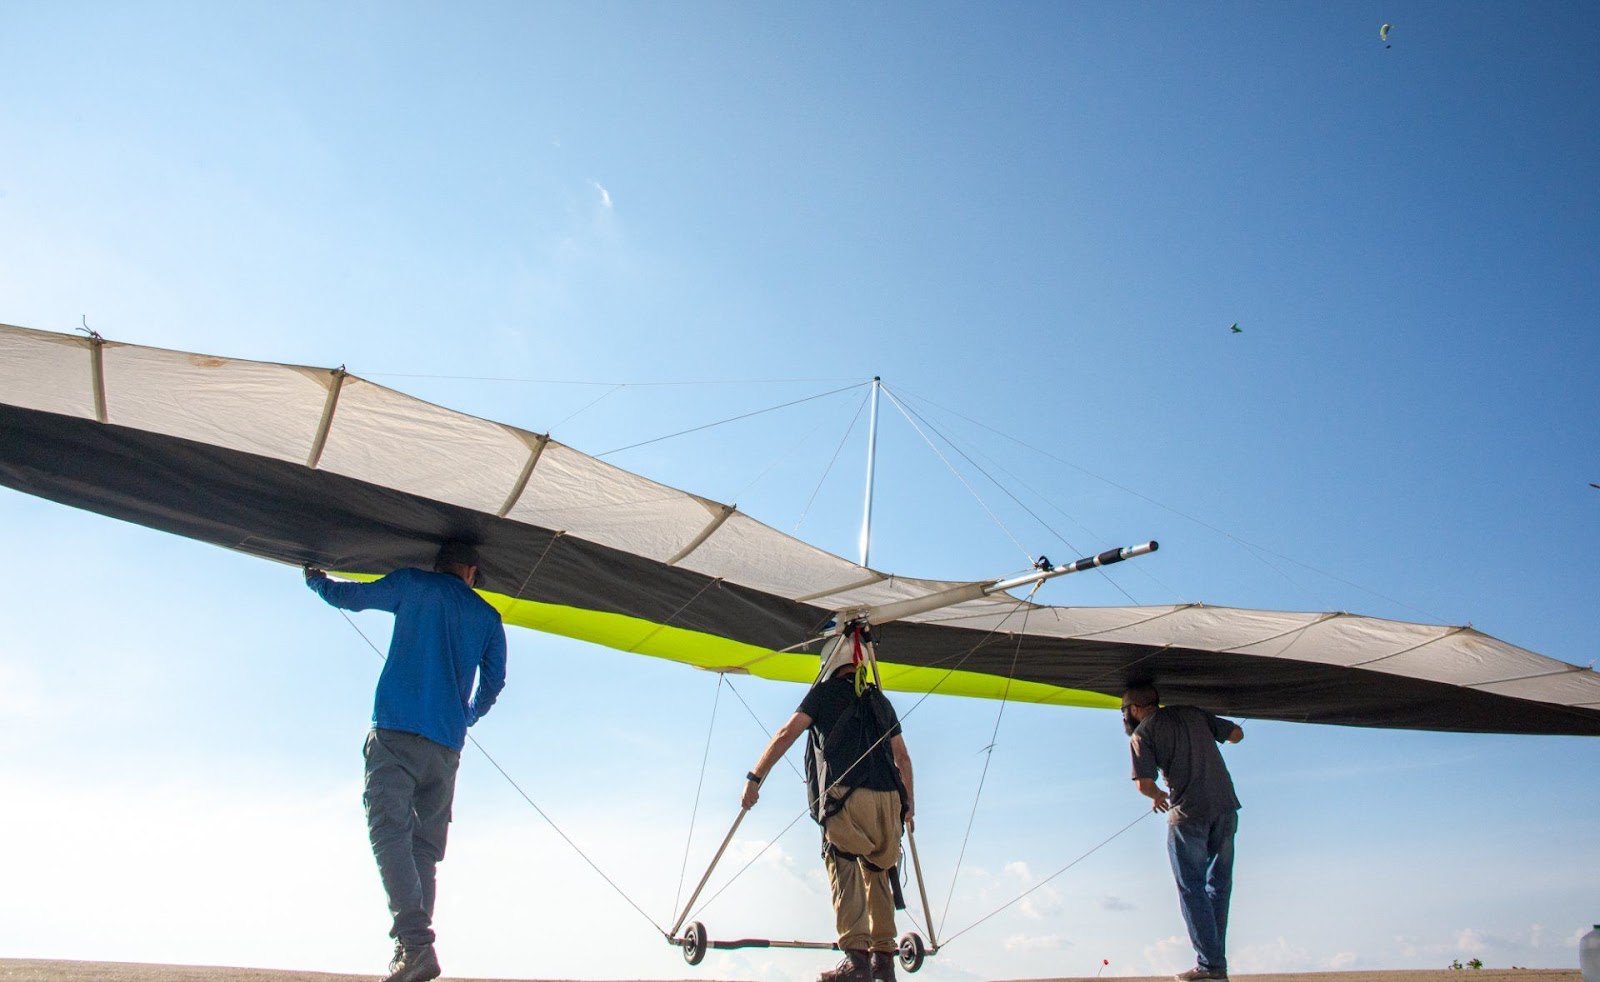
7. THE RESPONSIBILITIES OF A WIRECREW

Before you pick your wirecrew, we should probably describe the different positions involved and how conditions dictate how they are used.
As stated previously, in light conditions with gusts under 5 mph, it is perfectly acceptable to launch without assistance. In these conditions, you, the pilot, should be able to achieve optimal control via solely your application of direct control inputs.
As the wind speeds top 5 mph and the gust factor increases, it can be wise to have at least one, if not two spotters on your wings increasing your potential indirect control capacity.
Spotters are there to help you raise or lower your wings, shift one forwards or backwards as needed; exercising your indirect control in order to reach optimal control prior to launching. The ideal though, is that you, the pilot, directly control the glider as effectively as possible.
But as the conditions strengthen, more and more indirect control will be needed and your crew will become more and more important in managing the glider. Soon, your wirecrew’s indirect inputs will become absolutely essential in order to prevent you from turtling behind launch.
In light conditions though, your wire assistant’s role is to lightly hold the wire and prevent it from getting out of control. Most typically, if any input is needed, it will be to prevent the upwind wing from rising higher than the downwind.

The proper hand positioning for a wirecrew is to have one hand right where the wire meets the glider’s leading edge and the other about a foot lower on the wire. In case a gust rips through, you will want to wrap your fingers around the wire with a firm grip to prevent it from getting out of control.
You may hear people asking you to hold their wires differently; to have one hand up and one hand down, to only use your fingertips and many other potential arrangements. We do not recommend these options and instruct our students to have both hands facing palm down with their fingers and/or palms fully wrapped around the top of the wire. This is to ensure your ability to effectively prevent the wing from getting out of control.
Even on a relatively calm day, a booming thermal can tear up launch and cause a light 4 mph breeze to turn into an 18 mph gust. These things can happen in an instant and the two-handed, palms down grip is the best way to immediately prevent a glider from getting out of control in gusty conditions.
Your job as a wirecrew is to secure the wing and report what it is doing and then release it when the pilot commands you to do so. If there is such a height difference between pilot and crew that the spotter must hold the wire way over their heads or bend over to get under the wing, we recommend finding replacements.
In order to maintain maximum control, we ideally want to keep the wires around chest level. There is a lot of debate about open hands and other grip techniques, however the notion that open hands are a safer option incase the pilot bolts – forgetting to say clear – or that in the moment of excitement the wire spotter is for some reason incapable of letting go, is a bit farfetched. Let’s not make this any more complicated than it is; hold on to the wire, communicate what it is doing and release it when directed.
You will want to communicate at regular intervals; every 5-20 seconds and immediately when your inputs change. If the wing is pulling up – say UP – and if it is pulling down – say DOWN. If you are not feeling any up or down motion, then the word is NEUTRAL.
If needed, the pilot may direct you to let a wing up a bit or pull one wing back as they find the glider’s balance. Be patient and give clear communication, it is vital to speak loudly and clearly in order to help your pilot get their wing balanced.
So what about the keel spotter? Their job is to keep one hand hovering in front of the rear wires where they join the keel and the other hand right under the keel behind the wire junction. While approaching the edge of launch, your keel spotter will have the best view of the windsock, streamers and on-coming traffic. As you get your wings balanced, your keel spotter should keep you constantly informed of any changes in wind direction, speed and traffic. They are not to actively touch the glider unless you or another member of your wire crew shout BACKOFF!
If the backoff command is given, the keel spotter is to grab the rear wires and the keel itself and securely pull the glider and pilot back up the ramp to a safe position. You may see or hear of keel spotters playing a role in helping manage a pilot’s nose angle. This is a delicate task and should only be left to instructors. If you as a pilot need active management of your nose angle while launching, you should not be launching in windy soarable conditions.
8. COMMON WIRECREW COMPLICATIONS
Often a pilot will tell their wirecrew that they want to “feel the glider.” A common improper response to this request is for the wirecrew to allow their wing to rise every time the wind loads that wing.
This will push the other wing down while the wing under question keeps going up and the pilot feels that the glider is way out of balance and that is because IT IS out of balance!
You have little hope of getting things balanced with this error in technique. A solution; have your wirecrew hold the wing steady – you, the pilot, look at the deflection of the wires to see what is actually going on and visually verify what you are hearing and feeling.
We must use all of our senses while launching and this visual cue can be incredibly useful. If you see a difference in deflection angle, you can ask that the wire person on the left let their wing up a little and the one on the right move their wing forward a little or let it up a bit as well, or vice versa as the situation demands. This is a great technique to balance your wing!
Another potential problem can arise when your wirecrew is overly cautious and they really want to ensure that you are secure. Often what happens in this situation is that one person continually holds down their wing. This then forces the other wing up using the pilot as a fulcrum. All of a sudden both left and right wirecrew are pulling fairly hard thinking that they have strong lift pulling the wing up, when in fact there is minimal lift and they are just crushing the pilot.
Depending on the heights of the wirecrew and pilot, where the wing wires join the crossbar on the glider’s leading edge can be pretty high in the air. If a wirecrew pulls the wire even with their chest, it can cause the wire to put a lot of tension on the pilot’s shoulders.
This scenario may make everyone on launch think that there is a lot of wind, but the reality is the opposite; there is little wind forcibly lifting the wing and the pressure is artificially produced by the wirecrew. The solution is simple; look to one wireperson and ask them to let their wing up a bit. Do the same on the other side until you can feel the wing become properly balanced.
If either or both of your wirecrew looks like they are pulling down too much, tell them not to let go and give them the necessary commands to get in balance; up / down / forward / backward as needed. With the right adjustments, you will be able to get the wirecrew to reduce their pull on the wires and get the glider lifting its own weight. If there is enough wind, you can get the glider to lift enough to tighten your harness strap and start lifting your weight – this is the only way you will be able to really feel the glider flying before you launch.
If the wind is light, then our optimal control potential is further and further away from our total control potential when the glider is fully loaded and flying. In lighter wind conditions, the glider will not be able to be flying and carrying its whole weight. The glider will still be holding a part of its weight and the pilot can feel if it is balanced properly like you would on a slope launch. In this situation you will still want a wirecrew to ensure that if a thermal comes through you don’t lose control of the wing, but this is more preventative control rather than active indirect control. In this case, the wirecrew will exert fairly light pressure on the wires unless the wind suddenly picks up.
Even in windy conditions, if the glider is loaded with a good portion of the pilot’s weight, the wirecrew should be exerting minimal effort and not be needing to hold on with much force. In this situation, the pilot is maximizing their direct control. If the wind gusts and starts lifting the glider, the pilot can pull their weight forward (pull in) and this will cause the wirecrew to feel the wing’s wires pulling out.
Pro tip: if you feel your wing getting out of control, lower your nose angle! Reducing your angle of attack is one of the quickest direct inputs to regain control of your glider.
Be patient getting your glider loaded before clearing your wirecrew and try not to overthink this process. You do not want to rush your launch and try to fix things in the air. There is no need to ask for strong or light up – keep it simple – ask for UP if the wing is UP and DOWN if it is down – NEUTRAL if it is neutral. Tell the wirecrew what your launch word will be (CLEAR) and make sure to tell them that if anyone is uncomfortable, say BACK OFF and we will all back off together.
The back off command has been extremely valuable over the years. People feel vulnerable out on the ramp, especially when conditions are strong. At Lookout, when you are way out by the red line and the wing is pulling you and your wirecrew up, down, forward and backward at the edge of the wide open sky – it can become very stressful very quickly.
Allowing any of your wirecrew to shout BACKOFF and reset the launch process if they feel uncomfortable is a valuable tool in our risk management toolbox. If it comes between you and them, many wire helpers will unintentionally let you go fly off of launch in a tumble before they allow the wire to pull themselves off of the ramp; self-preservation is a strong instinct.
Keep in mind that in extra strong conditions, you may need or want two people on each wire; extra backups never hurt! Also, in stronger conditions, we like to use the word READY to notify our wirecrew that we are nearing our release point prior to issuing the CLEAR command. If all feels right, loudly say READY, pause, look at each wing person – all’s good – CLEAR!
If a pilot asks you to manage their wires in a different method than those we have described here, and you feel comfortable doing so, do so. Launch is no place to get in an argument over hand positioning.
On the flip side, if you as a pilot have someone on your wire managing it in a way that you are unfamiliar with or makes you feel uncomfortable, do not hesitate to ask them to modify their technique in order to match your preferred method.
In both situations, if you feel uncomfortable being a part of the process, remove yourself! If the pilot’s insistence on you holding their wires with just your fingertips in a 20 mph breeze makes you feel uncomfortable, excuse yourself. If your wirecrew’s insistence on yanking down and letting up on your wire to “let you feel it” makes you want to shout expletives, calmly find a replacement; have them secure the wing and calmly excuse the incompatible wirecrew person by asking them to back off of the ramp.
The important thing is to not let our egos get involved. Hearing can be difficult on a windy launch with pilots wearing helmets and all bundled up. We are shouting to be heard over the conditions. It can be an amped up stressful situation, although it doesn’t need to be that way.
You may find yourself on the wire of a novice pilot who is not speaking with authority and is clearly getting themselves into a situation that is beyond their experience. You may have someone on your wire that is thinking the exact same thing!
At all times and on all wirecrews, every participant has the right, and is in fact encouraged, to call “BACK OFF” and calmly reset the launch if they feel it is necessary. This should not be cause for anger or disgruntlement. No reason to shout “You #@^&ed up my launch!” It is important to remember that the only intention here is safety!
9. HOW TO PICK A CREW

As a new pilot, it will be hard for you to know who to use on your keel and wires; but as the pilot in command, it is up to you to select and brief your wirecrew. There is no easy answer on who to pick, we can only make some suggestions; hang around launch and get to know other pilots, watch them fly, watch them handle their wirecrews, watch how they help other pilots launch and ask yourself if you trust them enough to help you get safely off.
If instructors are available, they will be happy to help you. Unfortunately, we cannot be there all the time; if we are otherwise occupied, feel free to ask advice on who to choose from the pilots currently on launch. Nobody will intentionally do anything to sabotage your launch. Even if you have instructors or more experienced pilots on your crew, it is still up to you to control the launch, communicate what you expect and ask for assistance if anybody sees anything that they don’t like.
The best way to learn is to participate in as many launches as possible. You will see it all and sooner than later the best practices outlined here will start to make sense. If you are unable to get comfortable on launch with your wirelaunch crew, back off and try a bit later.
So what do we communicate and how do we communicate it?
You should communicate to your crew in a clear and effective manner using concise language and an authoritative voice. YOU are the pilot in command, act like it! Hooked in on launch with a sock full of wind is absolutely not the time to be heeming and hawing, mumbling in hushed tones and/or second guessing yourself.
If you are not able to step up to launch with a clear plan and communicate it effectively with authority, no offense, but you probably shouldn’t be there; you may need more professional instruction to get where you need to be in order to confidently launch in windy conditions. At the same time, you do not want to overload your wirecrew with a litany of details and requests that takes five minutes to describe and requires multiple post-it notes just to keep track. Keep it short and to the point but make sure you clearly communicate the amount of indirect control you want your wirecrew to be exerting and how they are to make you aware.
Make it a habit to use the same briefing each time you go to launch, adjusting as needed to match the conditions. Even if they are good pilots, it is dangerous to assume that your wirecrew will do what you want them to do without proper instruction.
In our experience 95% of all blown launches come down to poor communication, impatience and pilot error. We have very seldom seen a wire person cause a crash – it has happened, but usually as a result of poor pilot communication or impatience.
Pilots get frustrated trying to feel a properly loaded wing and after too much messing around they say CLEAR and figure that they will fix it in the air. This is a mistake! The number one culprit in this situation is the pilot stating that they want to feel the wing and the wirecrew trying to accommodate their request and miscommunication occurs. In windy conditions, especially gusty thermally conditions, your launchable cycles are short and the glider is only properly loaded for a small window of that cycle.
Learning to deal with this is an advanced skill and many who do have the skills and experience to handle these conditions do not choose to fly in these conditions any longer. Why? Consider this; the stronger the air on launch, the greater the risk… Hmmm… makes sense right?
You will want to give your briefing after your hang check and just before stepping onto the ramp. After your briefing, it is always a good idea to do another quick “hookin” check; simply lift the glider up off your shoulders and ensure that you are still attached to your hang loops.

Yes, yes – you already did a hang check, but who knows; maybe after finding your keel spotter you realized you forgot your airspeed indicator, ran to the car and jumped back in the control frame without hooking in. Better safe than sorry! And, remember, if anything is not correct during your hang check, start all over from the beginning. Realizing you forgot to buckle your helmet and then forgetting to make sure your heads-up line is cleated may lead to quite the surprise once you’re off in the air.
10. RELEASE SIGNALS
Your wirecrew briefing should verbalize the feedback you expect your wing spotters to communicate; simply “up”, “down” and “neutral.” You should communicate how much control you want to maintain; “I want to control the glider as much as possible, y’all just keep it from getting out of control” to “I want you guys to keep my wings level and communicate what it is doing.” The distinction between these two approaches is a fine one, but comparing them as tools for moderate versus strong conditions may help clarify.
In moderate but smooth conditions (10-15 mph and minimal gust factor), you may very well be able to keep your wings level through your direct control inputs with minimal indirect control assistance from your wirecrew. If you feel one wing getting out of whack, you can ask your wirecrew to lower that wing and move forwards or backwards as needed. When moving forward on the ramp, it is always a good idea to keep your nose angle down and ask your wirecrew to help you keep the wing down until you get in position. Once in position, ask them to let up slowly and allow you to take as much direct control as possible.
As conditions strengthen, (15+ mph and/or a gust factor of 5+ mph) there is no way you will be able to hold the wing in place by yourself, no matter how strong or experienced you are. In these conditions, you will need to rely on your wirecrew’s indirect control to actively hold the wing in place, keeping the glider level and communicating to you the loading each wing is currently experiencing; up, down and neutral.
Now some pilots will ask you to communicate “strong up” if the force on the wire feels exponentially stronger. This is a tricky command to make as some pilots’ conception of strong is another’s moderate. Older pilots often flew in far rowdier conditions than we fly in today. For these pilots, “strong up” may only be voiced when a “tear-your-hands-off” 35 mph gust rips through.
To a novice pilot, “strong up” will likely be shouted if a gust 5 mph stronger than the prevailing wind rolls up the ramp. In order to prevent confusion, we recommend sticking to just “up”, “down” and “neutral” and saving “strong up” for only when you are really fighting to keep the glider in control.
Next, after having communicated the signals you want your wirecrew to use and how active a role you want them to play in managing your glider, you will want to describe your planned route on the ramp.
This usually goes something like; “I am going to go up to the compass, you guys help me keep my nose down on the way there. Once I get to the compass, I’ll take a breather, and then I’m going to approach the red line, as I am doing this I want you guys to keep an eye on the streamers and let me know if there is any traffic coming. A few feet from the red line, I am going to stop and start trying to feel the glider as much as possible. Let me feel the glider but please keep it from getting out of control and keep me regularly updated with up, down, neutrals. I am going to want to go on two neutrals, or two ups. My word is CLEAR! If anybody has any issues, say BACKOFF and we backoff. Thanks in advance, and once again, if you see anything that is an issue, please let me know and let’s backoff.”
There’s a lot going on here, so let’s unpack it. One, it is always a good idea to take a moment once actually on launch to catch your breath and reassess the situation. Now is a good time to make sure that there are no incoming hang gliders at ridge level, sense the air and see what the cycles are doing. You should ask your wirecrew to check for traffic and changes in wind direction and velocity, they have the ability to get in front of your wing for a better view. In moderate conditions, we often launch with just two wire spotters on either side. As the conditions pick up, a keel spotter can be very helpful. Put all these pieces together, approach the red line, get your glider balanced, shout CLEAR, keep your nose down and fly away!